Thursday, March 12, 2015

3 12 2015 DNAzol with Fresh Tissue Pt. 2

Today I ran a gel using the freshly isolated DNA from yesterday. You can see the post about it here. The gel protocol is as follows.

75 ml TAE with 0.6 g Agarose and 7.5 ul EtBr.

Loaded the wells with 10 ul 100 bp ladder and 15 ul DNA loading solution (Mix of 15 ul DNA and 3 ul loading dye).
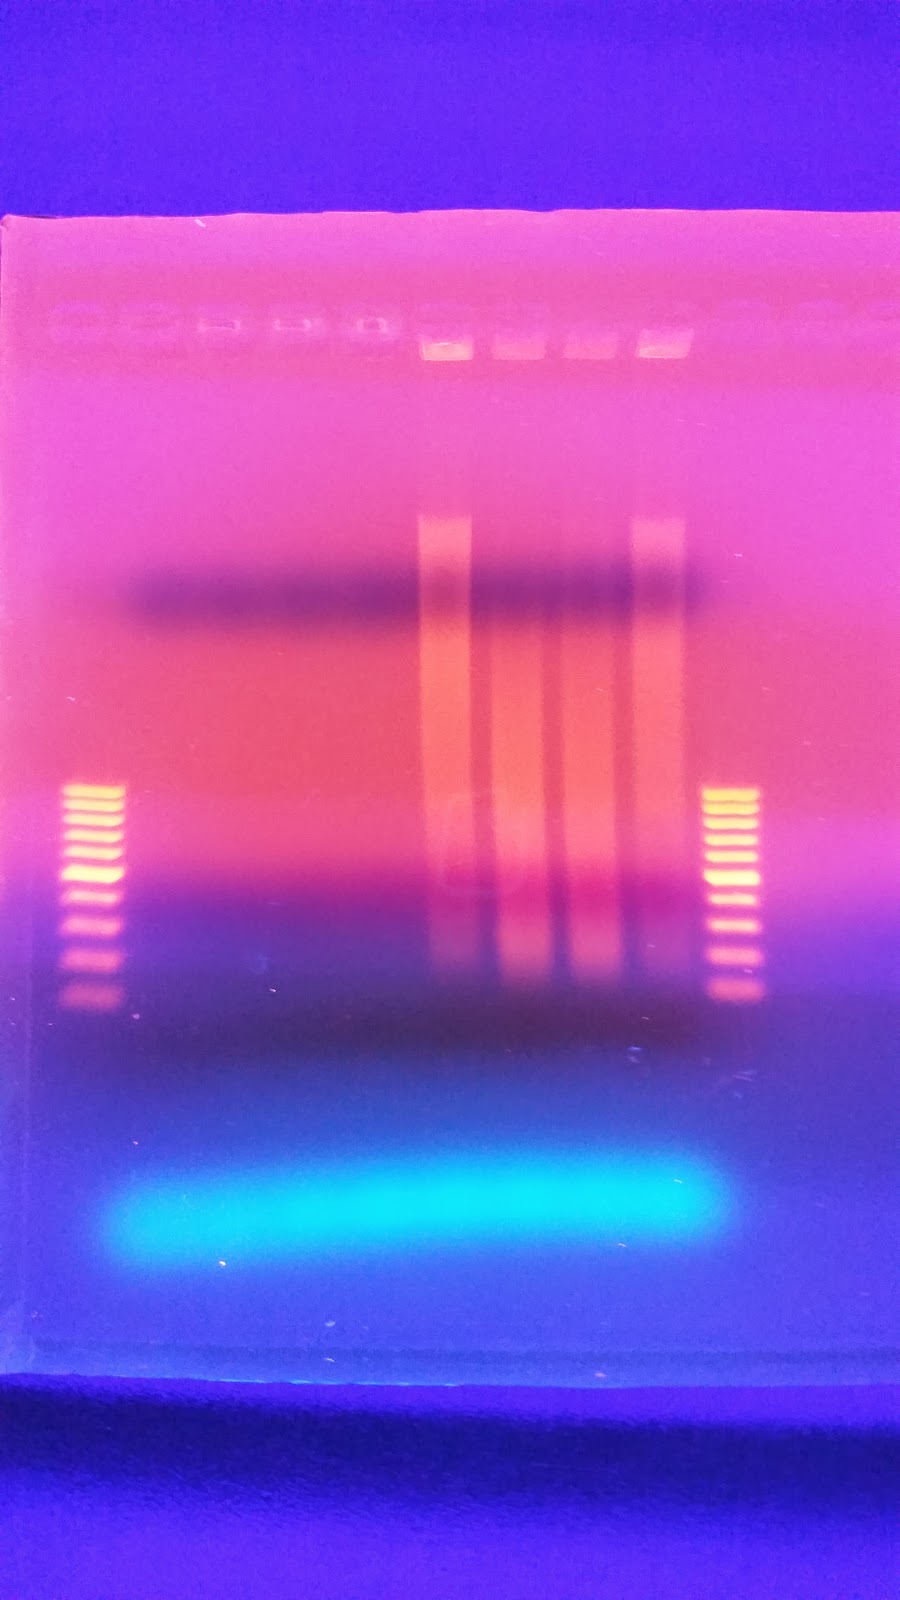
Well123456789101112
TechniqueCentrifugedSpooled
SampleLadderTest Oly 1Test Oly 2Test Oly 3Test Oly 4Test Oly 1Test Oly 2Test Oly 3Test Oly 4LadderEmptyEmpty

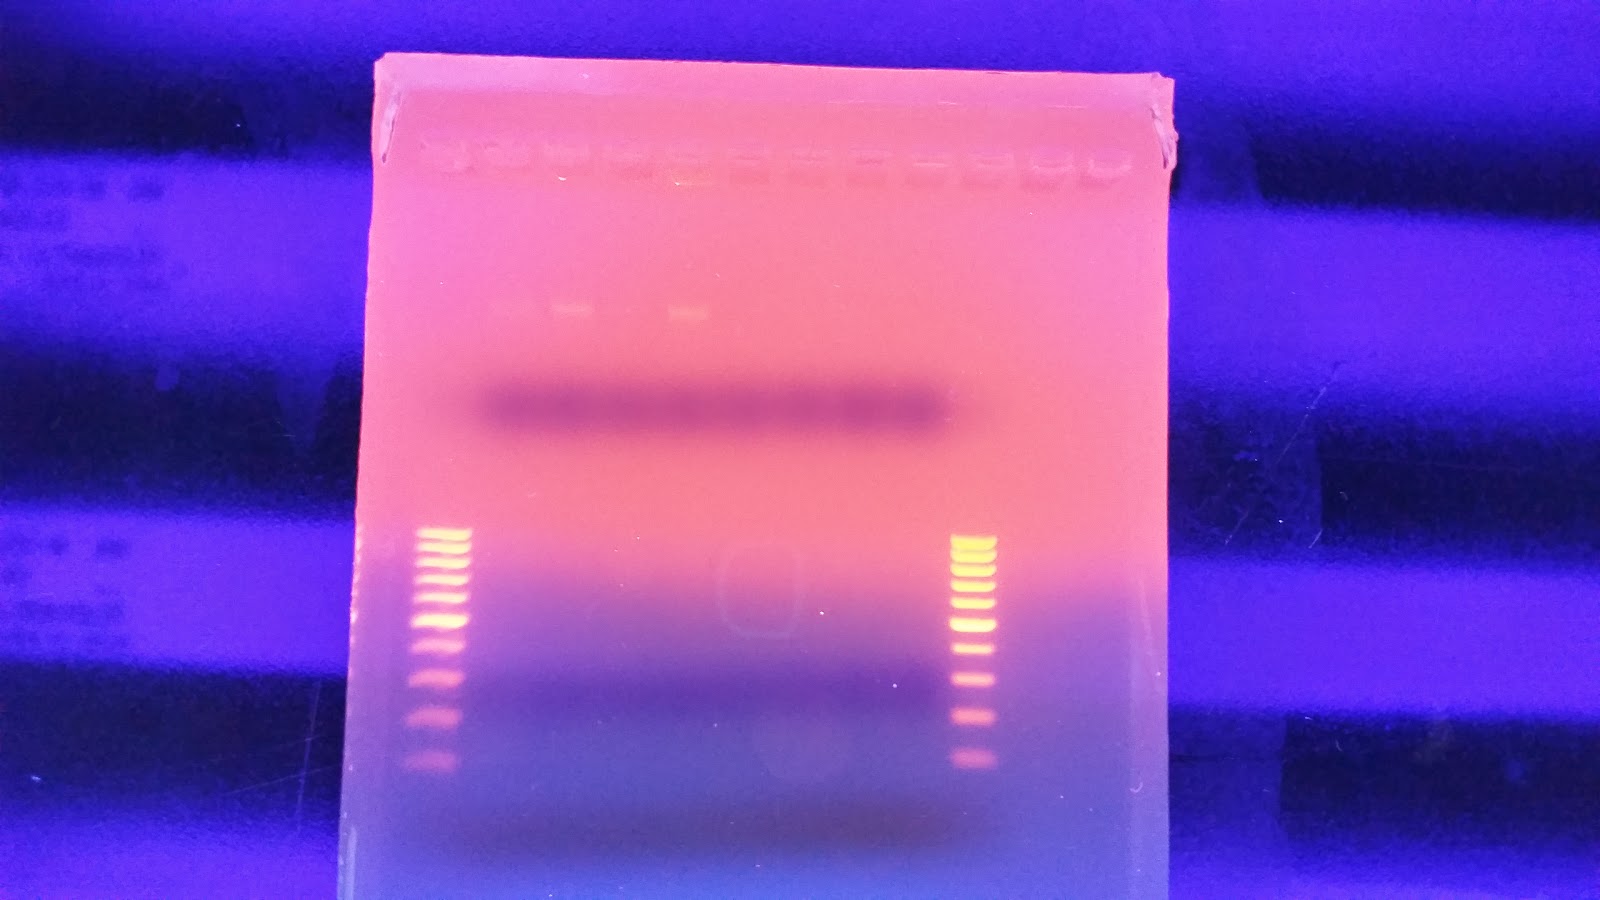
Gel with Fresh Tissue Isolation
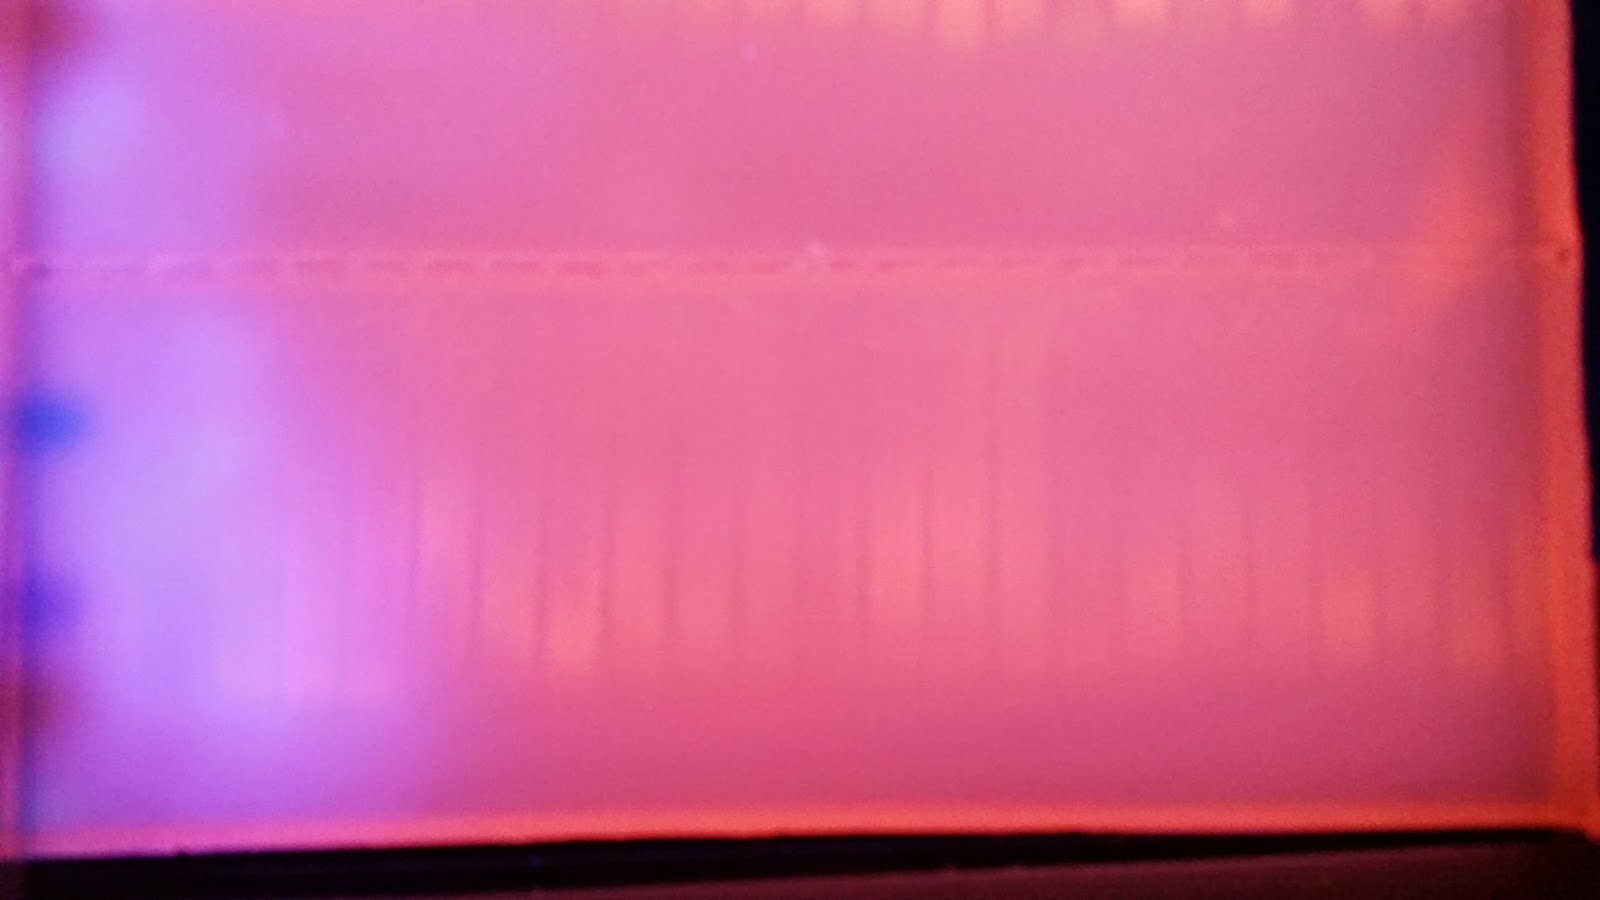
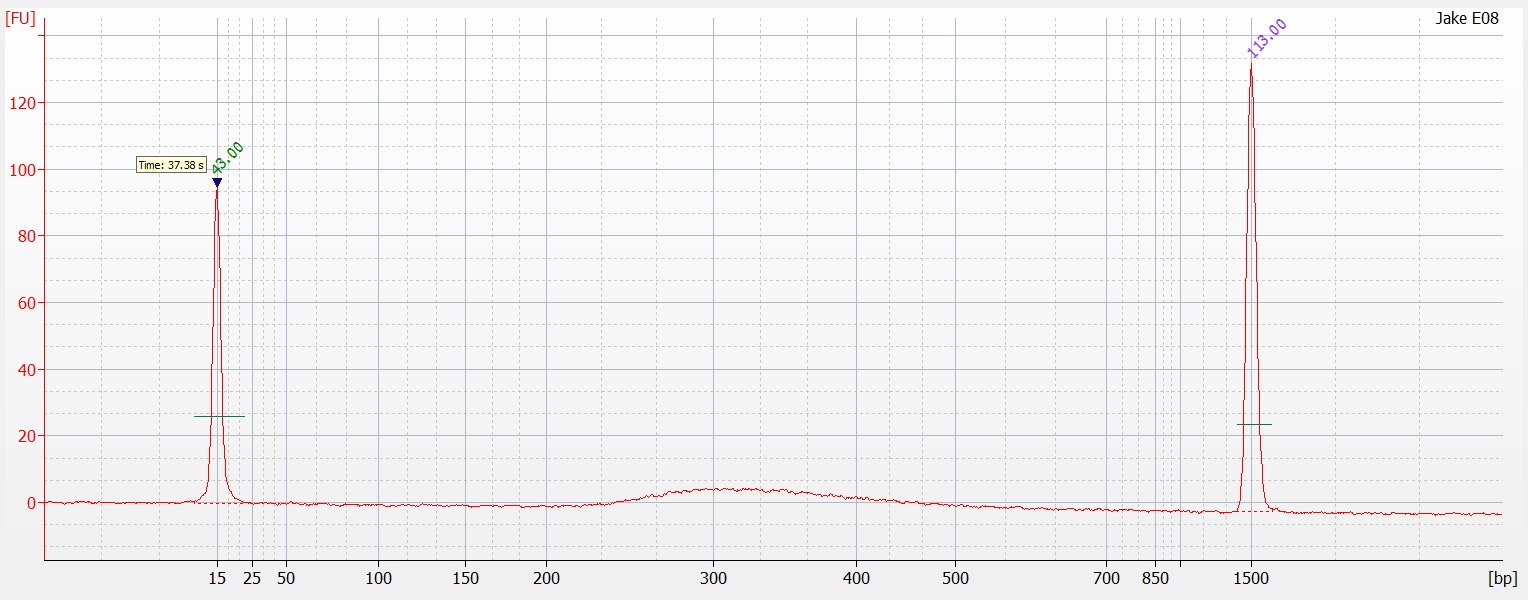
I have no idea where the DNA when. I saw a ton of it yesterday when I was extracting the DNA. I'm wondering if I missed it. When I was pulling the sample to load as it may have sank to the bottom of the tube and I collected off the top. On the bright side you can see two bands of HQ High molecular weight DNA. in the Centrifuged set. I will run another gel tomorrow to see if I can get better samples to appear on here. 

This makes me wonder if there is something wrong with the freezer tissue that has degraded the High molecular weight stuff. I talked to Andy yesterday and he told me all of his sablefish samples were stored in EtOH to avoid degradation. Either way this is up for consideration.
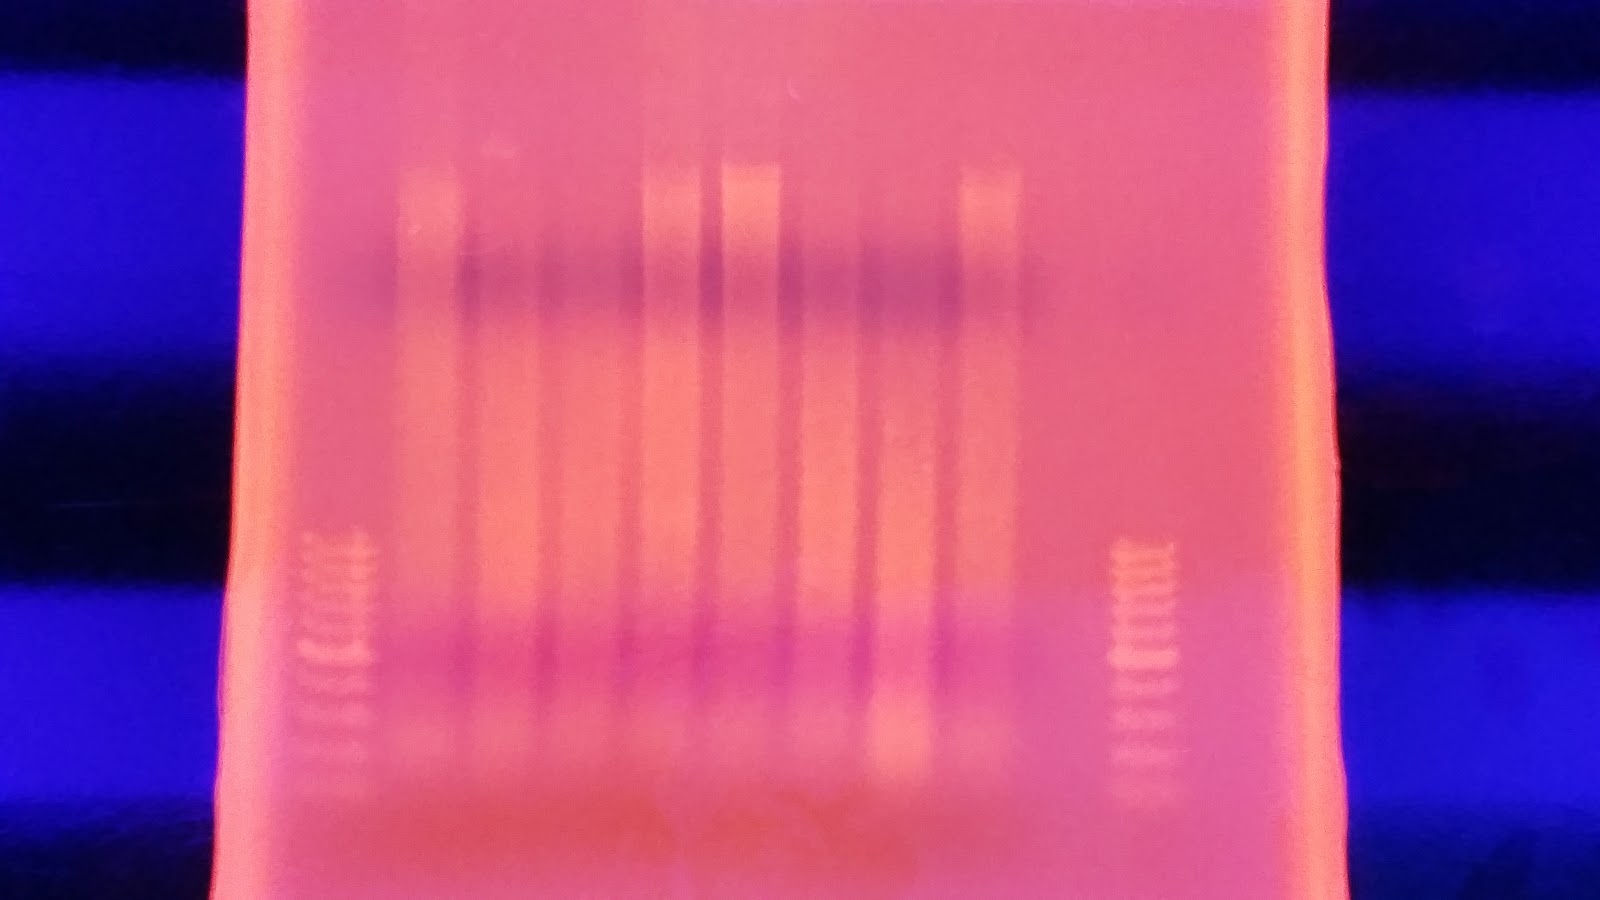
**Update 3/13/2015**
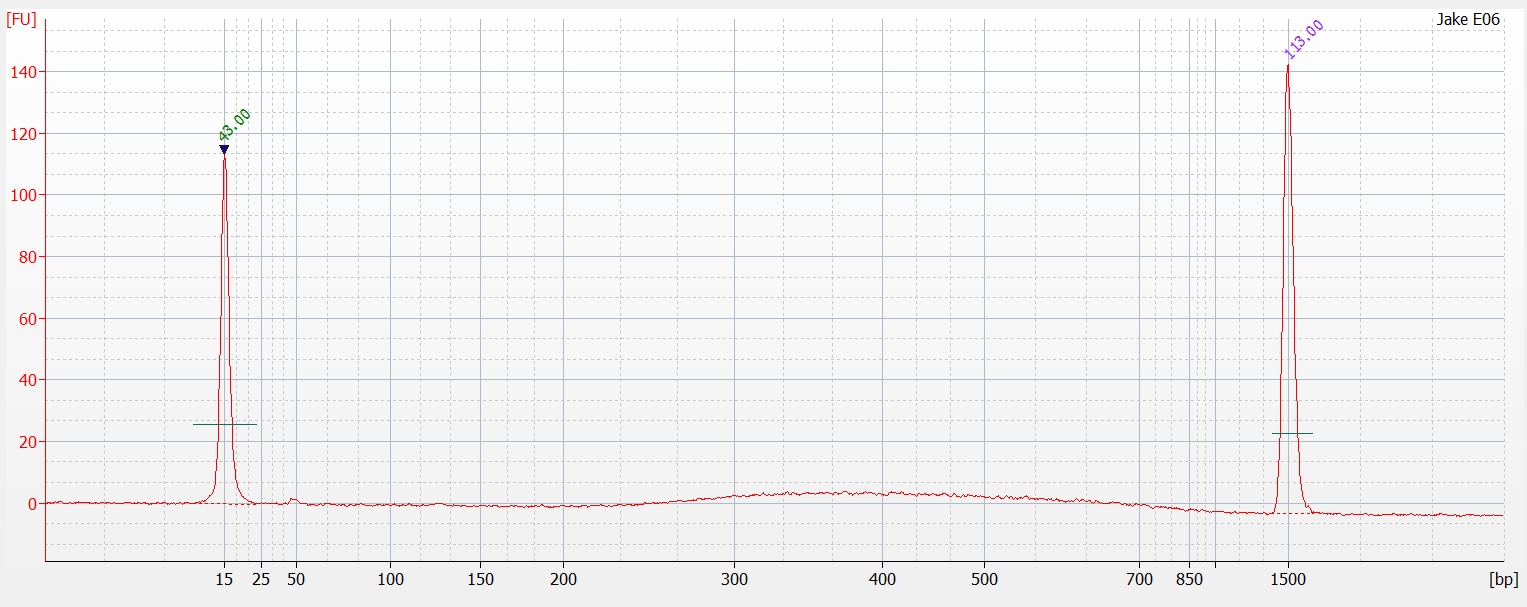
I ran the same protocol again this morning except this time I mixed the samples very well before pulling a sample from them. After running the gel, it looks almost identical except sample #1 looks better in the second sample. I'm not sure what happened with this protocol but supposedly that single band is confirmation of high quality high molecular weight DNA.
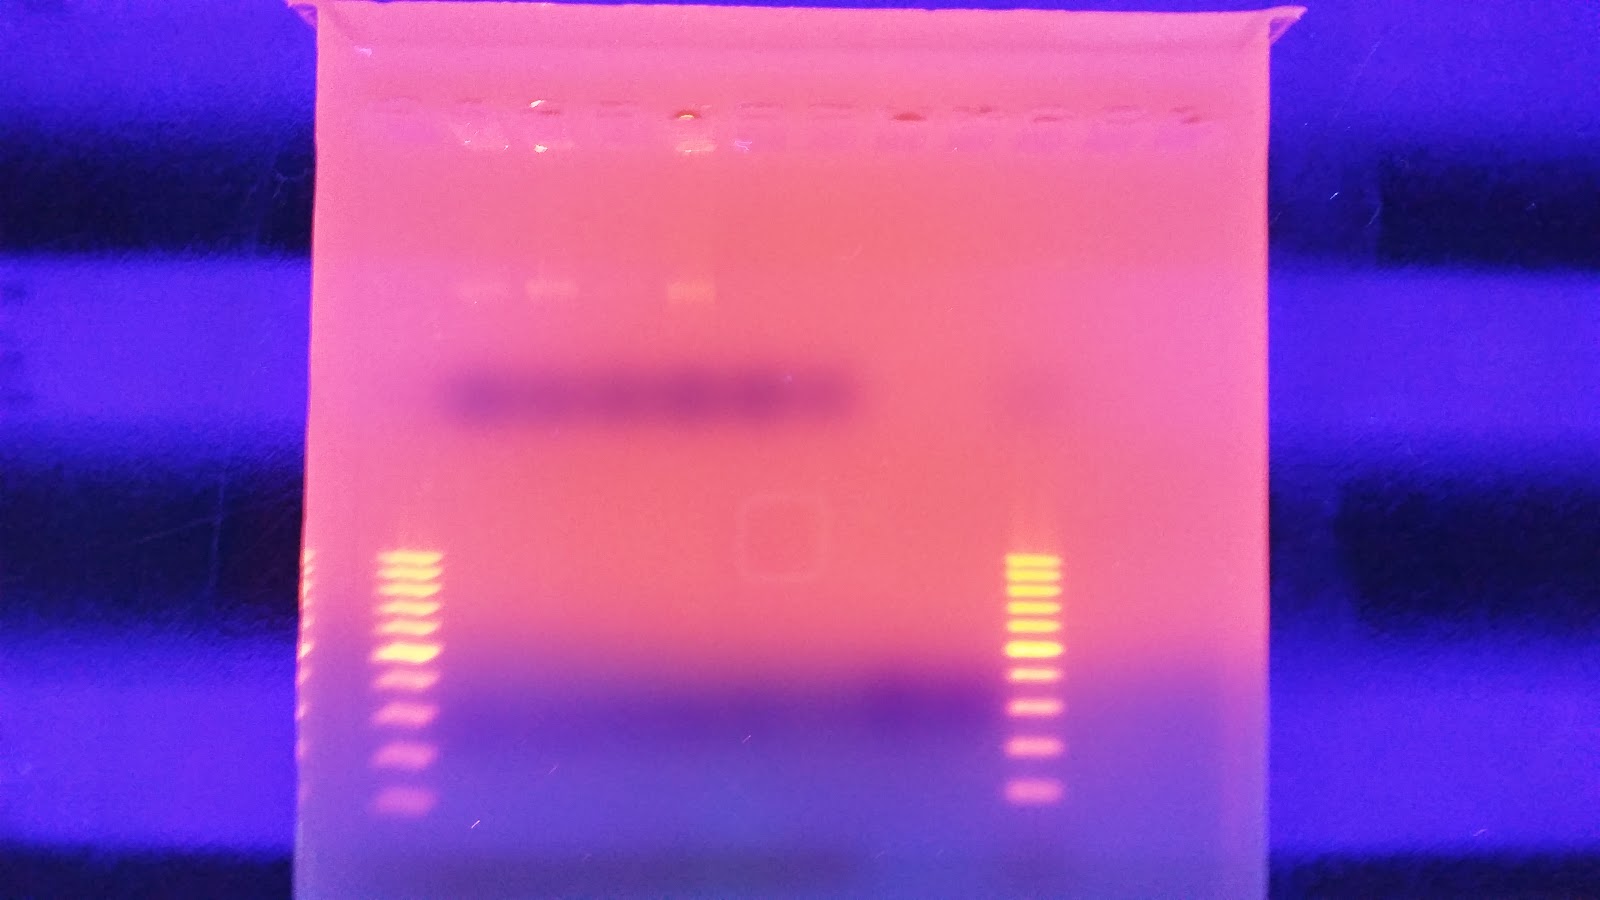

Wednesday, March 11, 2015

3 11 2015 DNAzol Isolation with Fresh Tissue

So we've been having trouble with our tissues from previous samplings. Since they have all been preserved dry in -20 conditions for months to over a year we decided to attempt an extraction on Olympia oysters fresh from a hatchery. I collected 4 oysters from a South Sound population from the Ken Chew Hatchery thanks to Puget Sound Restoration Fund and Ryan Crim. I performed the first half of the DNAzol isolation tonight with tissues that I dissected out of living animals. Samples ranged from 30-70 mg in size which is close enough to the proper DNAzol range. Like the last time I did a DNAzol extraction, I split the samples into spooled and remnants. Surprisingly, the DNA spooled very very well. There was a clear difference between how these samples behaved during the extraction process and the previous samples. All reagents and techniques are identical to the previous extraction so no difference should be observed unless there's something to fresh extractions.

Protocol:


  1. Dissected out grain of rice size piece of mantle tissue from each oyster and placed in collection tube. 
  2. Added 1 ml DNAzol reagent to tube. 
  3. Homogenized using pestle for 45 seconds
  4. Incubated at room temp for 10 minutes
  5. Centrifuged sample at 10,000 g for 10 minutes
  6. Extracted supernant and placed into a fresh tube
    1. Large goopy looking clumps in supernant that had clearly not compacted during centrifugation were present. 
  7. Added 500 ul 100% EtOH to supernant
    1. Instantly produced large amount of bright white material
    2. After inversion mixing, large goopy strings of precipitate formed on the bottom
  8. Spooled goopy material on the bottom of the tube and placed into new tube
  9. Centrifuged remaining supernant at 5,000 g for 5 minutes.
    1. No pellet formed in these tubes. 
    2. Slight film on tube walls.
  10. Added 1 ml 75% EtOH to tubes.
    1. In the original tubes nothing happened
    2. In the spool tubes bright white strings of material appeared and solution clouded up
  11. Incubated for 1 minute at room temp.
  12. Centrifuged tubes at 1,000 g for 2 minutes
    1. spooled tubes had large amount of material still in suspension
    2. Recentrifuged these tubes at 10,000 g for 2 minutes
    3. film and pellet formed from spooled tubes
  13. Removed EtOH as best I could
    1. Due to strings of material I couldn't remove all of it
  14. Eluted samples with 300 ul of Nanopure water. 
All in all, these samples behaved totally different. Previous samples would not spool and remained in supernant which formed a solid pellet. These samples spooled very well, leaving little in the supernant and formed a film and loose pellet of material. Adding Ethanol made DNA precipitate visibly unlike before. 

I will run these samples on a gel tomorrow but I get the feeling they are going to have high quality DNA in them. If this works, future samples should be collected and isolated immediately or within a short time frame. 

Monday, March 2, 2015

3 2 2015 DNAzol Extraction Attempt 2

A little over a week ago I attempted to isolate DNA using DNAzol and DNEasy to collect high molecular weight DNA. You can see the results here. I originally thought we had collected HMW DNA as the smears were mostly above the 1000 bp portion of the ladder. After discussing the results with Brent and Steven, it appears the HMW DNA is not large enough and should be a tightly condensed band at the top. Today I am extracting more DNA using DNAzol to try to extract only the HMW DNA using a spooling technique. The samples I'm using are the same ones from before since I had plenty of left over tissue (9-19-2014 1N9-12 18,19,20,21). To compare the spooling technique to the centrifuge technique, I spooled as much DNA as I could and transferred it to a clean second tube. Then centrifuged the original sample tube to collect a pellet. If I successfully collected the HMW DNA with the spooling it shouldn't appear in the centrifuged sample. If I didn't collected it, then the spooled sample should have little to no DNA. The rest of the protocol is as follows. I will run a gel on the samples this afternoon to check the sample quality.

DNA Isolation:


  1. Subsampled very small portion of tissue from original tubes and placed into homogenization tube. 
  2. Added 1 ml DNAzol to each tube
  3. Homogenized with 10 strokes of the pestle.
  4. Incubated at room temp for 10 minutes.
  5. Centrifuged at 10,000 g for 10 minutes.
  6. Transferred supernant to new tube.
  7. Added 0.5 ml 100% EtOH. 
    1. Originally saw a milky precipitate form but then disappear after mixing through inversion.
  8. Mixed through inversion (8 inversions)
  9. Incubated at room temp for 3 minutes. 
  10. Stuck a clean 200 ul pipette tip into solution and gently swirled solution around tip to spool DNA. Transferred to new labelled 1.5 ml tube and gently slid the tip across the inner surface of the tube.
    1. No visible spooled DNA. I repeated spooling multiple times to collect as much as possible but saw no visible DNA.
  11. Added 1 ml 75% EtOH to spooled DNA tube.
  12. Centrifuged original tube 5,000 g for 5 minutes. 
  13. Removed supernant from centrifuged tube.
  14. Added 1 ml 75% EtOH to Centrifuged DNA tube.
  15. Centrifuged all tubes at 1,000 g for 2 minutes to collect DNA in the bottom. 
  16. Carefully removed all remaining EtOH from all tubes. 
  17. Added 300 ul Nanopure water to each tube.
  18. Mixed through pipetting. 
  19. Stored at 4C until I can run the gel. 
**UPDATE**
I completed the gel run this evening for quality checking. It appears the spooling failed but upon examination of the centrifuged samples that there is a load of HMW DNA remaining in the well that did not travel through the gel. So the DNAzol works with the centrifuge extraction. 

0.8% Agarose Gel with Low TAE and 5 ul of EtBr. Ran gel at 120 v for 40 minutes.
Gel Layout

Well123456789101112
TechniqueSpooledCentrifuged
SampleLadder1N9-12 181N9-12 191N9-12 201N9-12 211N9-12 181N9-12 191N9-12 201N9-12 21LadderEmptyEmpty
Full Gel

High Molecular Weight DNA remaining in Well.

Friday, February 20, 2015

2 20 2015 Test DNA Extraction Methods Part 2

Yesterday, after discussing the poor results from the 96 well plate extraction, I decided to directly compare the Qiagen DNEasy kit with the DNAzol method. You can see what I did in yesterday's blogpost. Today I completed the DNEasy extraction with only an overnight incubation instead of 24 hours due to concerns of dnases destroying genomic DNA during the incubation. I started the lysis incubation yesterday.

Today I performed the following protocol for DNEasy extraction.


  1. Vortexed Samples to mix up lysed tissue
  2. Allowed them to sit for 10 minutes while I made up a gel. 
  3. Added 200 ul Buffer AL with EtOH from the 96 Well Kit
  4. Added 200 ul 100% EtOH
    1. This was a mistake as the 96 well kit premixes them and the singles kit does not. We ended up using a 75% EtOH, 25% Buffer AL Solution. 
  5. Vortexed thoroughly
  6. Pipetted into a column
  7. Centrifuged at 6000 g for 1 minute
  8. Discarded collection tube
  9. Added 500 ul AW1 for wash and new collection tube
  10. Centrifuge at 6000 g for 1 minute
  11. Discarded collection tube
  12. Added 500 ul AW2 for wash and new collection tube
  13. Centrifuged at 10,000 g for 6 minutes
  14. Discarded collection tube
  15. Placed column in labelled 1.5 ml tube
  16. Added 200 ul AE elution to column
  17. Incubated 1 minute at room temp
  18. Centrifuged at 6000 g for 1 minute
  19. Repeated steps 16, 17, 18. 
  20. Discarded column and stored at room temp. 
Following the completion of the DNeasy extraction I ran a gel with both sets of isolations. 

0.9% Gel:
50 ml 1X Low TAE
0.45 g Agarose

Microwaved gel for 4 minutes. Allowed to cool for 10 after thoroughly dissolved. Poured gel smoothly. Allowed to set for 30-45 minutes. 

Loaded wells with 
10 ul 100 bp Ladder
25 ul DNA with 2.5 ul Loading dye. 

Wells organized like:

Well123456789101112
TechniqueDNAzolDNEasy
SampleLadder1N9-12 181N9-12 191N9-12 201N9-12 211N9-12 181N9-12 191N9-12 201N9-12 21EmptyLadderEmpty

Gel comparing DNAzol to DNEasy
First, There does appear to be intact High Molecular Weight DNA. Second, surprisingly the Qiagen produced a higher yield in the same sample. This makes me wonder if the 24 hour incubation allowed more DNases to chew through the DNA. If I do the plate extraction again, I will only allow for a 12-18 hour incubation period. Also I think the smaller tissue size helped immensely. It look like high molecular weight does vary between samples with less of it in two of the samples. Since all samples were processed the same way I'm not sure what this could mean in terms of sample quality and yield for sequencing. 

Moving forward, we should consider doing the 96 well extraction again with smaller tissue sizes, less incubation time, and possible the 75/25 mix of the AL solution.

Thursday, February 19, 2015

2 19 2015 Test DNA Extraction Methods

Due to the low yields of high molecular weight DNA in the 96 Well Plate extraction and some advice from Brent and Steven, I'm now directly comparing DNEasy extractions with DNAzol. I selected 4 samples from the Oyster Bay September 2014 samples (1N9-12 18,19,20,21) to extract. I put equal amounts (visually pieces about the size of a grain of rice made of mantle and ctenidia) of each sample into two separate 1.5 ml tubes. One set of tubes is being processed using the DNEasy single sample kit with reagents from the 96 Well plate kit since both use the same reagents and the 96 Well plate kit is far fresher. The other set of tubes has been processed using the standard DNAzol technique.

The DNEasy kit takes an overnight incubation at 56 C so I filled the tubes with 180 ul ATL buffer and 20 ul Proteinase K. Vortexed to mix, centrifuged for 30 seconds, vortexed to resuspend and stuck into the incubator. These tissues will be processed tomorrow.

The DNAzol kit protocol went as follows.

  1. Added 1 ml DNAzol to tissue tube. 
  2. Homogenized using cleaned/previously used pestle with 5-10 strokes and grinding.
  3. Incubated at room temp for 10 minutes. 
  4. Centrifuged at 10,000 g for 10 minutes. 
  5. Moved 700-900 ul supernatant to fresh tube.
  6. Added 500 ul 100% EtOH (bottled opened 1/20/2015)
  7. Mixed through inversion. 
  8. Incubated for 3 minutes at room temp. 
  9. Centrifuged at 5000 g for 5 minutes
  10. Removed supernant
  11. Washed with 1 ml 75% EtOH
  12. Vortexed until pellet broke up. 
  13. Centrifuged at 2000 g for 2 minutes. 
  14. Removed supernatant.
  15. Washed with 1 ml 75% EtOH
  16. Vortexed until pellet broke up. 
  17. Centrifuged at 2000 g for 3 minutes.
  18. Carefully removed all supernatant. Used 1 ml pipetter to remove bulk and 200 ul pipetter to remove leftovers. 
  19. Added 300 ul Nanopure water.
  20. Mixed through pipetting. 
Lots of DNA created. DNA elution is almost milky in two of the samples. 

Will quantify tomorrow after I finish DNEasy extraction. 

Wednesday, February 18, 2015

2 18 2015 96 Well Plate Extract Gel Run

Today I ran half of the 96 well plate extraction (part 1 and part 2) on a 1.3% agarose gel to determine the quality of the DNA isolated. Sadly the DNA is heavily degraded and there appears to be no high molecular weight band. To fit all of the samples, I did not add a ladder which would tell us exactly what the weight of the DNA is. Overall this is very disappointing. I'm going to run the other half tomorrow to see if maybe they are of better quality or may there was a loading issue with the samples.

Protocol for today:

Used a super sized gel mold and wells. So it took a pretty big volume.

Gel:
500 ml 1X Low TAE
6.5 g general purpose agarose


Microwave solution for 3 minutes at a time until boiling.
Visually inspect for dense materials (apparently I didn't do well enough as one corner of the gel was higher density than the others.

Placed two rows of 24 well combs in gel mold.
Slowly poured gel into one corner of the mold.

Allowed get to set for 30 minutes.
Once gel was firm I placed it in the electrophoresis chamber.
I filled the chamber with 1 X Low TAE solution until it was even with the gels top surface.

Pipetted 30 ul of Low TAE into each well. Then loaded wells with DNA using the 12 channel pipette in a left to right, top to bottom pattern.

Ran gel for 10 minutes at 120 v.
Paused gel and added 1 ul 5X loading dye to the left most well on both rows.
Ran gel for another 10 minutes at 120 v.
Paused gel and added 1X Low TAE until gel was thoroughly covered.

Ran gel for 1.5 hours until dye had moved appropriately far down the lane.

Placed gel in EtBr bath made 1 L water and 1 ml EtBr.
Soaked gel for 30 minutes.

Imaged on the translinker.

Samples organized:


Well123456789101112131415161718192021222324
Top Row1N1-4 11N1-4 21N1-4 31N1-4 41N1-4 51N1-4 61N1-4 71N1-4 81N1-4 111N1-4 101H1-4 11H1-4 21H1-4 31H1-4 41H1-4 51H1-4 61H1-4 71H1-4 81H1-4 91H1-4 101S1-4 11S1-4 21S1-4 31S1-4 4
Bottom Row1S1-4 51S1-4 61S1-4 71S1-4 81S1-4 91S1-4 102N1-4 12N1-4 22N1-4 32N1-4 42N1-4 52N1-4 62N1-4 72N1-4 82N1-4 92N1-4 102H1-4 12H1-4 22H1-4 32H1-4 42H1-4 52H1-4 62H1-4 72H1-4 8

Full Gel

Top Row Samples A1-12, B1-12

Bottom Row Samples C1-12, D1-12


Tuesday, February 17, 2015

2 17 2015 Bioanalyzer Results for BS Libraries

Today I was able to look at the bioanalyzer data that Sam sent me. It looks like most of the samples failed. A couple of the samples had very small peaks between 300-500 bp but they were basically negligible. You can also see some faint smearing in those regions in the gel view but again there was so little material that it probably not possible to retrieve any useful data from them.

Gel View of the Bioanalyzer data. 
Electropharogram View, minimal peaks seen
Electropharogram View of the 3 samples with noticeable peaks. 

Friday, February 13, 2015

2 13 2015 oyster bay sample move

Oyster Bay Wa
1030 am to 1 pm
Mid 50s foggy.

Moved the samples today from the calm fresh dock to the taylor mussel raft. 

Checked the samples quickly for mortality. Low to no mortality in each container. All animal look good and healthy. Fidalgo animals look much larger than the other two pops. They are also super dense. They feel like they weigh 50-75 grams. Compared to oyster and dabob which feel between 30-50 grams. 

Due to time constraints for the taylor boat, I was not able to image any populations for size. I pulled the logger data on both tags.  Samples were hung on the taylor rafts with bright orange tags with contact info.

Finally the new dock at crab fresh will be completed by the end of march. I plan to move the samples back from the taylor raft in mid april.

Thursday, February 12, 2015

2 12 2015 DNA Isolation Part 2

As with yesterday's post, I'm finishing up the 96 Well Plate Qiagen DNEasy extraction kit. Today I worked in the MERLab because of the proximity to the centrifuge that can fit the kit plates. I brought all the reagents, pipetters, pipette tips, and gloves. I ended up borrowing a graduate cylinder but I cleaned it thoroughly before and after use. A couple things to note, I lost some of the lysate from the samples as a couple of the caps were not as secure as I thought were and popped open during the first shaking step. Luckily these mostly came from the first column which as you can tell by the plate set up only affected one or two samples from each population sampled. Also on the elution step I repeated it twice because on the first run through, Row A received half as much buffer as intended. When I repeated the elution I over filled Row A and now there is about 500 ul of isolate instead of 400 ul. I will run a gel on the samples next week to check quality. Hopefully Row A is not extremely diluted. Though I can probably concentrate it without too much trouble. Also I used the sample channel reservoir for every solution. Between solutions I rinsed with water and did a final rinse with DI Water. I wiped it dry with a paper towel.

Today's Procedure:


  1. After incubating roughly 24 hours at 56 C samples were sealed and shaken (lost some lysate due to poor seals on a few caps).
  2. Centrifuge at 5700 rpm for 20 second.
  3. Uncapped/Added 410 ul premade Buffer AL/EtOH solution.
  4. Capped with new caps. Shook for 20s.
  5. Centrifuge at 5700 rpm for 20 second.
  6. Placed a DNeasy 96 well column plate on the previously used S Block. 
  7. Attempted to remove 600 ul of lysate from each sample
    1. Some had more some had less due to volume of tissue and loss of lysate. Most sample tubes appeared visually to be at roughly the same volume.
  8. Sealed plate with Airpore sheet.
  9. Centrifuged at 5700 rpm for 11 minutes.
  10. Decanted solute from S Block. Wiped with Paper towel. 
  11. Removed Airpore tape. 
  12. Added 500 ul Buffer AW1 to each sample
  13. Seal with Airpore tape.
  14. Centrifugee at 5700 rpm for 6 minutes. 
  15. Removed Airpore tape. 
  16. Added 510 ul Buffer AW2 to each sample. 
  17. Centrifuged at 5700 rpm for 16 minutes. (Used no airpore tape per instructions)
  18. Moved DNeasy 96 well column plate to Elution Microtubes plate. 
  19. Added 200 ul Buffer AE to each sample (Row A got ~100 ul)
  20. Sealed with Airpore tape. 
  21. Incubated for 1 minute at room temperature. 
  22. Centrifuged at 5700 rpm for 3 minutes. 
  23. Removed Airpore Tape. 
  24. Added 200 ul Buffer AE to each sample (Row A got 400 ul)
  25. Sealed with Airpore Tape
  26. Incubated for 1 minute at room temperature. 
  27. Centrifuged at 5700 rpm for 3 minutes. 
  28. Removed DNeasy column block from Elution Microtubes plate. 
  29. Sealed Microtubes with rubber tops flipping which which side the openning tab was on for every column. 
  30. Labelled sample with "O.lurida sample processed 2/12/2015. 09/14 Oyster, 10/14 Fidalgo Manchester. JH"
  31. Stored in the 4 C in 213. 

Wednesday, February 11, 2015

2 11 2015 DNA Isolation Part One

Today I'm isolating DNA using a Qiagen 96 well plate kit received in October 2014. I'm doing this because samples from the outplant oyster were of considerably poor quality for RAD-Sequencing. Now I'm process samples that were collected last September and October from all three populations at Oyster Bay, Manchester, and Fidalgo Bay. I think these samples are of better quality because of the short time between pulling them from the water and processing the tissues (24-48 hours).

Sample Date:
Oyster Bay    9/19/2014
Fidalgo Bay 10/17/2014
Manchester  10/24/2014

Sample Layout in 96 Well Plate

123456789101112
A1N1-4 11N1-4 21N1-4 31N1-4 41N1-4 51N1-4 61N1-4 71N1-4 81N1-4 111N1-4 101H1-4 11H1-4 2
B1H1-4 31H1-4 41H1-4 51H1-4 61H1-4 71H1-4 81H1-4 91H1-4 101S1-4 11S1-4 21S1-4 31S1-4 4
C1S1-4 51S1-4 61S1-4 71S1-4 81S1-4 91S1-4 102N1-4 12N1-4 22N1-4 32N1-4 42N1-4 52N1-4 6
D2N1-4 72N1-4 82N1-4 92N1-4 102H1-4 12H1-4 22H1-4 32H1-4 42H1-4 52H1-4 62H1-4 72H1-4 8
E2H1-4 92H1-4 102S1-4 12S1-4 22S1-4 32S1-4 42S1-4 52S1-4 62S1-4 72S1-4 82S1-4 92S1-4 10
F4N1-4 14N1-4 24N1-4 34N1-4 44N1-4 54N1-4 64N1-4 74N1-4 84N1-4 94N1-4 104H1-4 14H1-4 2
G4H1-4 34H1-4 44H1-4 54H1-4 64H1-4 74H1-4 84H1-4 94H1-4 104S1-4 14S1-4 24S1-4 34S1-4 4
H4S1-4 54S1-4 64S1-4 74S1-4 84S1-4 94S1-4 10ControlControlControlControlControlControl

I carefully placed each sample in the corresponding microcollection tube by removing the tissue from the original 1.5 ml sample tubes with flame sterilized forceps and gently sliding it into the collection tube. 

Then I created the working buffer by 2 ml proteinase K to 17.5 ml ATL buffer from the Qiagen kit into a 50 ml falcon tube. Then briefly vortexed the mixture and poured it into a channel pipetter liquid vessel. 

Using the 12 Channel Pipetter I pipetted 200 ul of the working buffer into each tube. 

I mixed the solution using inversion and then checked to see if all samples were submerged in the working lysis buffer. 

For samples that were not in the buffer I used a clean 1000 ul pipette tip to gently slide the sample into the buffer.

All samples were fully sumberged in the mixture and are now incubating at 56 C in FTR 228. 

Friday, February 6, 2015

2 6 2015 Library Creation for BS Samples

Today I made the libraries after doing the BS conversion yesterday. I used the Epigentek EpiNext Post-Bisulfite DNA Library Preparation Kit (Illumina) that was received on January 16, 2015. Since I'm multiplexing these to run on a single lane I also used a Epigentek EpiNext NGS Barcode (Index) Set-12 for the barcoding portion following those instructions instead of the other kits instructions. I used the converted BS DNA from yesterday. Assuming there was no loss of DNA in the BS Conversion process that amounts to 111 ng per 10 ul sample. The library creation process was as follows.

All volumes in ul. All reactions mixtures made by adding reagents from largest volume to smallest. Done in 1 96 well plate with strip caps covering open wells when not in use.  Borrowed Ambion 96-Well plate magnet from Seeb Lab. Thermocycler used was Ernie, the 96 Well Plate Cycler.

dsDNA Conversion

Reaction Mixture
ComponentVolume
BS DNA10
5X Conversion Buffer4
Conversion Primer2
Nanopure Water3
Total Volume19

  1. Made mixture, vortexed, centrifuged plate at 4300 rcf for 1 min 
  2. Incubated in Thermocycler without heated lid
    1. 5 min at 95 C
    2. 5 min at 4 C
  3. Added 1 ul Conversion Enzyme Mix
  4. Incubated in Thermocycler without heated lid
    1. 60 min at 37 C
Cleanup dsDNA
  1. Resuspended MQ Binding Beads via vortex
  2. Added 36 ul beads to samples
  3. Vortex to mix
  4. Centrifuged plate 4300 rcf for 1 min
  5. Vortex to resuspend beads in sample (decided not to vortex/centrifuge again)
  6. Incubate at 10 minutes at room temp
  7. Place plate on magnet for 2 minutes to collect beads
  8. Removed supernant
  9. Washed sample with 200 ul 80% EtOH for 1 minute
  10. Removed supernant
  11. Repeated Wash once
  12. After removing supernant, allowed beads to air dry for 10 minutes 
  13. Removed Samples from magnet
  14. Resuspended beads in 12 ul Elution buffer via pipetting
  15. Incubated samples 2 minutes at room temp
  16. Placed sample back on magnet for 2 minutes
  17. Moved 12 ul supernants from Row A on plate to Row B
    1. Note Albion magnet doesn't work well with samples less than 25 ul. To attempt to clean up the beads, I held the magnet at an angle depending on which side of the magnet the beads were on and ran the sample over the magnet until visibly clear. Still did not fully remove beads from sample. 
DNA End Repairing

Reaction Mixture
ComponentVolume
dsDNA11
10x End Repair Buffer2
End Repair Enzyme Mix1
Nanopure Water6
Total Volume12
  1. Incubated in thermocycler with heated lid
    1. 30 min at 20 C 
Cleanup End Repair DNA
  1. Resuspended MQ Binding Beads via vortex
  2. Added 36 ul beads to samples
  3. Mixed via pipetting
  4. Incubate at 10 minutes at room temp
  5. Place plate on magnet for 2 minutes to collect beads
  6. Removed supernant
  7. Washed sample with 200 ul 80% EtOH for 1 minute
  8. Removed supernant
  9. Repeated Wash once
  10. After removing supernant, allowed beads to air dry for 10 minutes 
  11. Removed Samples from magnet
  12. Resuspended beads in 12 ul Elution buffer via pipetting
  13. Incubated samples 2 minutes at room temp
  14. Placed sample back on magnet for 2 minutes
  15. Moved 12 ul supernants from Row B on plate to Row C
    1. Note Albion magnet doesn't work well with samples less than 25 ul. To attempt to clean up the beads, I held the magnet at an angle depending on which side of the magnet the beads were on and ran the sample over the magnet until visibly clear. Still did not fully remove beads from sample.
DNA dA-Tailing

Reaction Mixture
ComponentVolume
End repaired DNA12
10x dA-tailing buffer1.5
Klenow Fragment1
Nanopure Water0.5
Total Volume15
  1. Incubated in thermocycler with heated lid
    1. 30 min at 37 C
    2. 10 min at 75 C
Adapter Ligation

Reaction Mixture
ComponentVolume
dA-Tailed DNA15
2x Ligation Buffer17
T4 DNA Ligase1
Adaptors1
Total Volume34
Note this reaction mixture is made directly in the same well as the last reaction
  1. Incubated in thermocycler without heated lid
    1. 10 min at 25 C
Clean Ligated DNA
  1. Resuspended MQ Binding Beads via vortex
  2. Added 34 ul beads to samples
  3. Mixed via pipetting
  4. Incubate at 5 minutes at room temp
  5. Place plate on magnet for 2 minutes to collect beads
  6. Removed supernant
  7. Washed sample with 200 ul 80% EtOH for 1 minute
  8. Removed supernant
  9. Repeated Wash twice
  10. After removing supernant, allowed beads to air dry for 10 minutes 
  11. Removed Samples from magnet
  12. Resuspended beads in 12 ul Elution buffer via pipetting
  13. Incubated samples 2 minutes at room temp
  14. Placed sample back on magnet for 2 minutes
  15. Moved 11 ul supernants from Row C on plate to Row D
    1. Note Albion magnet doesn't work well with samples less than 25 ul. To attempt to clean up the beads, I held the magnet at an angle depending on which side of the magnet the beads were on and ran the sample over the magnet until visibly clear. Still did not fully remove beads from sample.
Library Amplification

Sample Well Number, Sample ID, Barcode Used
Well NumberSampleBarcode
1HL28ATCACG
2HL26CGATGT
3HL31TTAGGC
4HL24TGACCA
5NF05ACAGTG
6NF12GCCAAT
7NF07CAGATC
8NF15ACTTGA
9SN08GATCAG
10SN04TAGCTT
11SN01GGCTAC
12SN15CTTGTA
In the barcode placeholder is replaced with one of the 12 barcodes depending on the sample

Reaction Mixture
ComponentVolume
2x HiFi Master Mix12.5
EpiNext Universal Primer1
Barcode (1-12)1
Ligated DNA11
Total Volume25.5
  1. Ran the PCR program in the thermocycler with heated lid
    1. 30 sec 98 C
    2. 20 sec 98 C
    3. 20 sec 55 C
    4. 20 sec 72 C
    5. Repeat 12 times Steps 2,3,4  
    6. 2 min 72 C
Cleanup library
  1. Resuspended MQ Binding Beads via vortex
  2. Added 25 ul beads to samples
  3. Mixed via pipetting
  4. Due to bubbles had to centrifuge 4300 rcf for 1 min
  5. vortexed beads into suspension
  6. Incubate at 5 minutes at room temp
  7. Place plate on magnet for 2 minutes to collect beads
  8. Removed supernant
  9. Washed sample with 200 ul 80% EtOH for 1 minute
  10. Removed supernant
  11. Repeated Wash twice
  12. After removing supernant, allowed beads to air dry for 10 minutes 
  13. Removed Samples from magnet
  14. Resuspended beads in 12 ul Elution buffer via pipetting
  15. Incubated samples 2 minutes at room temp
  16. Placed sample back on magnet for 2 minutes
  17. Moved 11 ul supernants from Row D on plate to Row E
    1. Note Albion magnet doesn't work well with samples less than 25 ul. To attempt to clean up the beads, I held the magnet at an angle depending on which side of the magnet the beads were on and ran the sample over the magnet until visibly clear. Still did not fully remove beads from sample.
Was not able to collect full volume of 11 ul from sample as beads were particularly troublesome in removing at this step. Attempted to clear them out using method described above but some just did not take. Without being able to measure it, it looks like most samples are between 9-11 ul in volume. 

Samples stored in -20 C freezer in 209. Will quantify with Sam next week to verify concentrations. 

Thursday, February 5, 2015

2 5 2015 Bisulfite Conversion

Today I completed my second attempt at Bisulfite conversion of the previously sequenced samples. Last time the samples were sonicated which resulted in fragments too small for the conversion at least by the kits instructions. The samples themselves failed to take for library creation so I'm attempting again to produce libraries for sequencing. Here I used the newest kit in our collection to ensure the quality of the kit components.

Samples and Quantity of water used for BS Conversion to great 200 ng in 24 ul were the following:

Plate NumberD4B4G4H3E5D6G5G6H9D9A9G10
SampleHL28HL26HL31HL24NF05NF12NF07NF15SN08SN04SN01SN15
Volume (ul) for 200 ng2.62.72.52.73.74.12.44.33.63.93.63.8
Water add (ul)21.421.321.521.320.319.921.619.720.420.120.420.2

The following was then performed based on the kits instructions:

  1. Added 1 ul of R1 to each sample
  2. Incubated sample for 10 minutes at 37C in moistened well heat block
  3. Made the R1/2/3 solution by adding 1.1 ml R3 to R2 powder and mixed till no solutes visible then added 40 ul of R1 solution. 
  4. Added 125 ul of fresh R1/2/3 solution to samples 1-10. Ran out but opted to use vial made up on 1/20/2015 by me instead of making more fresh solution since it has a short shelf life of around 2 weeks. The previously made vial is just past expiration but it was assumed it would still be viable. Added previously made solution to last two samples. 
  5. Vortexed samples vigorously and incubated at 65C for 90 minutes in moistened well heat block. 
  6. Added 300 ul R4 to sample, mixed through pipetting, and transferred to spin column in collection tube. 
  7. Centrifuged at 12000 rpm for 15 seconds (5 second spinup). Discarded flowthrough.
  8. Added 200 ul R5 solution (100% EtOH added previously to R5) to the column.
  9. Centrifuged 12,000 rpm 15 seconds (5 second spinup)
  10. Added 50 ul previously maded R1 solution (1.1 ml 90% EtOH with 10 ul R1) to 8 samples. Made fresh R1 solution and added it to the 4 remaining samples. 
  11. Incubated for 8 minutes at room temp.
  12. Centrifuged 12,000 rpm 15 seconds (5 second spinup) Discard Flowthrough
  13. Add 200 ul 90% EtOH to column
  14. Centrifuged 12,000 rpm 15 seconds (5 second spinup)
  15. Added 200 ul 90% EtOH to column
  16. Centrifuged 12,000 rpm for 35 seconds (5 second spinup) Discard flowthrough
  17. Placed columns in new 1.5 ml tubes.
  18. Added 18 ul of R6 to column filter.
  19. Centrifuged 12,000 rpm 20 seconds (5 second spinup)
  20. Stored samples at -20 C.