Titrations – Hollie’s Seawater Samples

Performed total alkalinity (TA) titrations on Hollie’s samples using our T5 Excellence titrator (Mettler Toledo) and Rondolino sample changer.

All data is deposited in the following GitHub repo:

Sample sizes: ~50g

LabX Titration Method:

Daily pH calibration data file:

Daily pH log file:

Titrant batch:

CRM Batch:

Daily CRM data file:

Sample data file(s):

See metadata file for sample info (including links to master sample info sheets):

Samples Received – Geoduck larvae metagenome filter rinses

Received geoduck hatchery metagenome samples from Emma. These samples are intended for DNA isolation.

Admittedly, I’m a bit skeptical that we’ll be able to recover any DNA from these samples, as they had been initially stored as frozen liquid, then thawed, and “supernatant” removed. I’m concerned that the freezing step would result in cell lysis; thus the subsequent removal of “supernatant” would actually be removing the majority of cellular contents that would be released during freezing/lysis.

Here’s the sample prep history, per Emma’s email:

Hi!
Here are the relevant details from my lab notebook:

Filters with bacteria to be extracted for proteomics: https://sr320.github.io/Geoduck-larvae-filters/

Each filter was rinsed and cells sonicated:

  1. Put filter on petri dish on ice
  2. Use 1-4 mL total to wash front (and back if not obvious where biol material is) of filter while holding with forceps over dish – Use 2 pairs of forceps; I used 4 mL ice cold 50 mM NH4HCO3 to wash inside of filter (filters were folded in half). Washed filters returned to bags and stored at -80C.
  3. Put wash collected in dish in eppendorf tubes – at this point, remove the amount that will be used for metagenomics (~1/4 of wash) – put 1 mL in metagenome tube (mg) and the remaining was split between 2 tubes for metaproteomics (mp)

These are bacterial cells in ammonium bicarbonate. I spun them down and removed most of the supernatant from each tube.

Let me know if you need any other info!

Box of samples (containing ~38uL of liquid) were stored in FTR209 -20C (top shelf).

Assembly – Geoduck NovaSeq using SparseAssembler (failed)

Steven came across a 2012 paper in BMC Bioinformatics (“Exploiting sparseness in de novo genome assembly”) that utilized an assembly program we hadn’t previously encountered: SparseAssembler

This software is intended to greatly reduce the required amount of RAM necessary to process very large assembly data sets. As I previously learned, RAM is a limiting factor for assembly programs, and the install (if you can even call it that) was simply upacking a zip file (program installations on Mox are not trivialso this seems like it has promise!

The job was run on our Mox node.

Here’s the batch script to initiate the job:

20180308_soap_novaseq_geoduck_slurm.sh

#!/bin/bash
## Job Name
#SBATCH --job-name=20180308_sparse_assembler_geo_novaseq
## Allocation Definition 
#SBATCH --account=srlab
#SBATCH --partition=srlab
## Resources
## Nodes (We only get 1, so this is fixed)
#SBATCH --nodes=1   
## Walltime (days-hours:minutes:seconds format)
#SBATCH --time=30-00:00:00
## Memory per node
#SBATCH --mem=500G
##turn on e-mail notification
#SBATCH --mail-type=ALL
#SBATCH --mail-user=samwhite@uw.edu
## Specify the working directory for this job
#SBATCH --workdir=/gscratch/scrubbed/samwhite/20180308_SparseAssembler_novaseq_geoduck

/gscratch/srlab/programs/SparseAssembler/SparseAssembler 
LD 0 
NodeCovTh 1 
EdgeCovTh 0 
k 117 
g 15 
PathCovTh 100 
GS 2200000000 
i1 /gscratch/scrubbed/samwhite/20180129_trimmed_again/AD002_S9_L001_R1_001_val_1_val_1.fastq 
i2 /gscratch/scrubbed/samwhite/20180129_trimmed_again/AD002_S9_L001_R2_001_val_2_val_2.fastq 
i1 /gscratch/scrubbed/samwhite/20180129_trimmed_again/AD002_S9_L002_R1_001_val_1_val_1.fastq 
i2 /gscratch/scrubbed/samwhite/20180129_trimmed_again/AD002_S9_L002_R2_001_val_2_val_2.fastq 
i1 /gscratch/scrubbed/samwhite/20180129_trimmed_again/NR005_S4_L001_R1_001_val_1_val_1.fastq 
i2 /gscratch/scrubbed/samwhite/20180129_trimmed_again/NR005_S4_L001_R2_001_val_2_val_2.fastq 
i1 /gscratch/scrubbed/samwhite/20180129_trimmed_again/NR005_S4_L002_R1_001_val_1_val_1.fastq 
i2 /gscratch/scrubbed/samwhite/20180129_trimmed_again/NR005_S4_L002_R2_001_val_2_val_2.fastq 
i1 /gscratch/scrubbed/samwhite/20180129_trimmed_again/NR006_S3_L001_R1_001_val_1_val_1.fastq 
i2 /gscratch/scrubbed/samwhite/20180129_trimmed_again/NR006_S3_L001_R2_001_val_2_val_2.fastq 
i1 /gscratch/scrubbed/samwhite/20180129_trimmed_again/NR006_S3_L002_R1_001_val_1_val_1.fastq 
i2 /gscratch/scrubbed/samwhite/20180129_trimmed_again/NR006_S3_L002_R2_001_val_2_val_2.fastq 
i1 /gscratch/scrubbed/samwhite/20180129_trimmed_again/NR012_S1_L001_R1_001_val_1_val_1.fastq 
i2 /gscratch/scrubbed/samwhite/20180129_trimmed_again/NR012_S1_L001_R2_001_val_2_val_2.fastq 
i1 /gscratch/scrubbed/samwhite/20180129_trimmed_again/NR012_S1_L002_R1_001_val_1_val_1.fastq 
i2 /gscratch/scrubbed/samwhite/20180129_trimmed_again/NR012_S1_L002_R2_001_val_2_val_2.fastq 
i1 /gscratch/scrubbed/samwhite/20180129_trimmed_again/NR013_AD013_S2_L001_R1_001_val_1_val_1.fastq 
i2 /gscratch/scrubbed/samwhite/20180129_trimmed_again/NR013_AD013_S2_L001_R2_001_val_2_val_2.fastq 
i1 /gscratch/scrubbed/samwhite/20180129_trimmed_again/NR013_AD013_S2_L002_R1_001_val_1_val_1.fastq 
i2 /gscratch/scrubbed/samwhite/20180129_trimmed_again/NR013_AD013_S2_L002_R2_001_val_2_val_2.fastq 
i1 /gscratch/scrubbed/samwhite/20180129_trimmed_again/NR014_AD014_S5_L001_R1_001_val_1_val_1.fastq 
i2 /gscratch/scrubbed/samwhite/20180129_trimmed_again/NR014_AD014_S5_L001_R2_001_val_2_val_2.fastq 
i1 /gscratch/scrubbed/samwhite/20180129_trimmed_again/NR014_AD014_S5_L002_R1_001_val_1_val_1.fastq 
i2 /gscratch/scrubbed/samwhite/20180129_trimmed_again/NR014_AD014_S5_L002_R2_001_val_2_val_2.fastq 
i1 /gscratch/scrubbed/samwhite/20180129_trimmed_again/NR015_AD015_S6_L001_R1_001_val_1_val_1.fastq 
i2 /gscratch/scrubbed/samwhite/20180129_trimmed_again/NR015_AD015_S6_L001_R2_001_val_2_val_2.fastq 
i1 /gscratch/scrubbed/samwhite/20180129_trimmed_again/NR015_AD015_S6_L002_R1_001_val_1_val_1.fastq 
i2 /gscratch/scrubbed/samwhite/20180129_trimmed_again/NR015_AD015_S6_L002_R2_001_val_2_val_2.fastq 
i1 /gscratch/scrubbed/samwhite/20180129_trimmed_again/NR019_S7_L001_R1_001_val_1_val_1.fastq 
i2 /gscratch/scrubbed/samwhite/20180129_trimmed_again/NR019_S7_L001_R2_001_val_2_val_2.fastq 
i1 /gscratch/scrubbed/samwhite/20180129_trimmed_again/NR019_S7_L002_R1_001_val_1_val_1.fastq 
i2 /gscratch/scrubbed/samwhite/20180129_trimmed_again/NR019_S7_L002_R2_001_val_2_val_2.fastq 
i1 /gscratch/scrubbed/samwhite/20180129_trimmed_again/NR021_S8_L001_R1_001_val_1_val_1.fastq 
i2 /gscratch/scrubbed/samwhite/20180129_trimmed_again/NR021_S8_L001_R2_001_val_2_val_2.fastq 
i1 /gscratch/scrubbed/samwhite/20180129_trimmed_again/NR021_S8_L002_R1_001_val_1_val_1.fastq 
i2 /gscratch/scrubbed/samwhite/20180129_trimmed_again/NR021_S8_L002_R2_001_val_2_val_2.fastq
Results

Output folder: 20180308_SparseAssembler_novaseq_geoduck/

Well, this failed, but not because of memory issues (which is a good start)!

Instead, it failed because the kmer size was too large??!!

See the slurm output log file:

Kmergenie had indicated a kmer size of 117bp.

Will reduce kmer size and try again. Fingers crossed…

Progress Report – Titrator

I’ll begin this entry with a TL;DR (becuase it’s definitely a very long read):

  • Sample weight (i.e. volume) appears to have an effect on total alkalinity (TA) determination, despite the fact that sample weight is taken into account when calculating TA.

  • Replicates are relatively consistent.

  • Our TA measurements of CO2 Reference Materials (CRMs) do not match TA info supplied with CRMs.

  • Conclusions?

    • The only thing that actually matters is consistent replicates.
    • Use 50g (i.e. 50mL) sample weights – will greatly conserve reagents (CRMs, acid)
    • Calculate offset from CRMs or just report our TA measurements and the corresponding CRM TA value(s)?
    • Ask Hollie Putnam what she thinks.

With that out of the way, here’s a fairly lengthy overview of what has been done to date with the titrator. In essence, this is a cumulative notebook entry of all the entries I should have been doing on a daily/weekly basis (I actually feel much shame for neglecting this – it’s a terrible practice and an even worse example for other lab members).

Teaser: there are graphs!

Anyway, I’ve spent a lot of time getting our titrator, protocols, and scripts to a point where we can not only begin collecting real data, but also actually analyze the data in a semi-automated way.

More recently, I’ve finally started taking some measurements to assess the consistency of the actual titrator and stumbled across an interesting observation that may (may not) have an impact on how we proceed with sample/data handling.


Protocols

Titrator SOP is the primary protocol that encompasses setting up/shutting down the titrator, use of the LabX software needed for recording/exporting data from the titrator, and how to implement the necessary scripts to handle the exported data is still in early stages.

In theory, the SOP should be rather straightforward, but due to the sensitivity involved with these measurements, the SOP needs to carefully address how to set things up properly, provide a means for documenting startup/shutdown procedures, and provide troubleshooting assistance (e.g. how to empty/remove burette if/when air bubbles develop).

Overall, it’s a bit of a beast, albeit and important one, but I’ve put it on the back burner in order to focus my efforts/time on getting to the point of being able to collect data from the titrator and feel confident that we’re getting good readings.

Once I get to that point and am able to begin running samples, I’ll be able to dedicate more time to fleshing out the SOP, including adding pictures of all the components.


Scripts

parsing_TA_output.R is the script that has consumed the majority of my titrator-related time in the last couple of weeks. It is fully functional (it only requires manual entry of the exported LabX data file location). However, I’m hoping to eventually automate this as well – i.e. when new LabX export file appears, this script will execute. I won’t be spending much time on this aspect of the script until I

This has been my highest priority. Without having this script in a usable state, it has been a MAJOR slog to manually retrieve the appropriate data necessary to use in TA determination.

This also has been my biggest challenge with the titrator process. Here are just some of the hurdles I’ve had to deal with in putting this script together:

  • “learning” R
  • handling “dynamic” titrator output data
    • this is not an easy task for a non-programmer!
    • the output data is of differing numbers of rows from sample to sample, so the script had to be able to handle this aspect automatically
    • making the script “flexible” (i.e. no “magic numbers”) to handle any number of samples without the user having to manually modify the script
    • making th script “flexible” by operating on column names instead of column numbers, since column numbers were/are not constant, depending on changes to the script
  • calculations resulting from two-part titration
    • still not sure if I ever would’ve figured this out if I hadn’t taken the intro computer science class at UW a couple of years ago!

Despite all of this, I also feel like it’s one of my biggest accomplishments! It’s super satisfying to have this script functioning with virtually no user input required!

pH_calibration_check.R is still a work in progess, but is easily usable. Currently, it still has some hard-coded values (row numbers) in it for parsing data, but that should be easy to fix after what I went through with the TA parsing script!

Eventually, these two scripts will work in tandem, with the pH_calibration_check script exporting data to a daily “log” file, which the parsing_TA_output script will use to read-in the necessary pH data.

TA_calculation.R will calculate the TA values, but currently requires fully manual data entry. It desperately needs attention and will likely be my primary focus in the immediate future, due to the need to have TA values for actual samples, as well as daily quality control checks (e.g. verify CRM measurements look OK before measuring actual samples).


Measurements

Consistency checks with Instant Ocean
Instant Ocean Tests

I ran nine replicates of Instant Ocean (36g/L in deionized water) at two different samples weights/volume (50g, 75g) to make sure the titrator was producing consistent results.

Here’s the R Studio Project folder with all the data/scripts used to gather the data and produce the plots:

TA values were determined using the seacarb R package. I used a salinity of 35 (seacarb default value?), but this has not been determined for this batch of Instant Ocean.

Sample Volume Mean TA Standard Deviation
50mL 669.4 11.14
75mL 645.0 11.96

The first thing I noticed was the low TA values when using Instant Ocean. I expected these to be more similar to sea water, but the Instant Ocean hasn’t been aerated, so maybe that could account for the low TA values. Regardless, this shouldn’t be too much of an issue, since I only wanted to use this to see if we were getting consistent measurements.

The second thing I noticed was the difference in TA values between the 50mL and 75mL samples. This is/was odd, as sample weight is taken into account with the seacarb package.

So, I decided to explore this a bit further, using the CRMs that we have. I felt that this would provide more informative data regarding measurement accuracy (i.e. do our measurements match a known value?), in addition to further evaluation of the effects of sample volume on TA determination.

Consistency checks with CRMs
CRM Tests

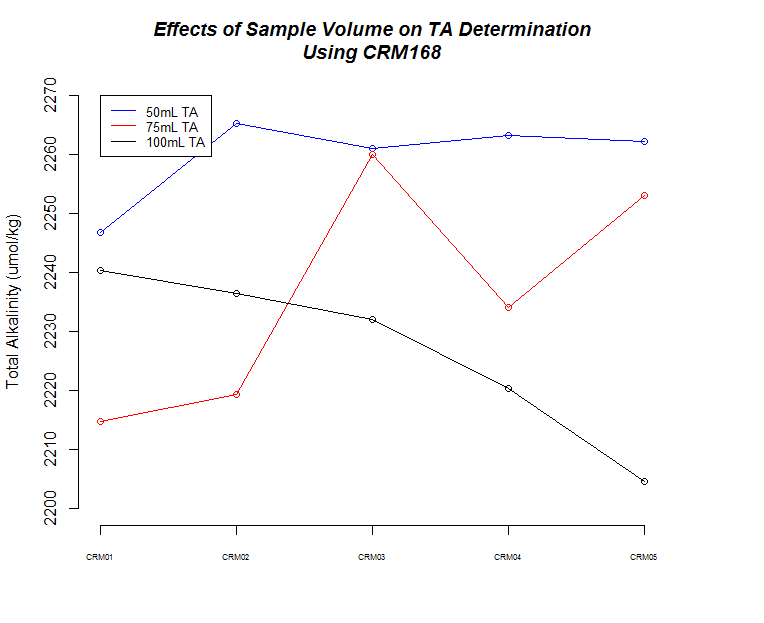
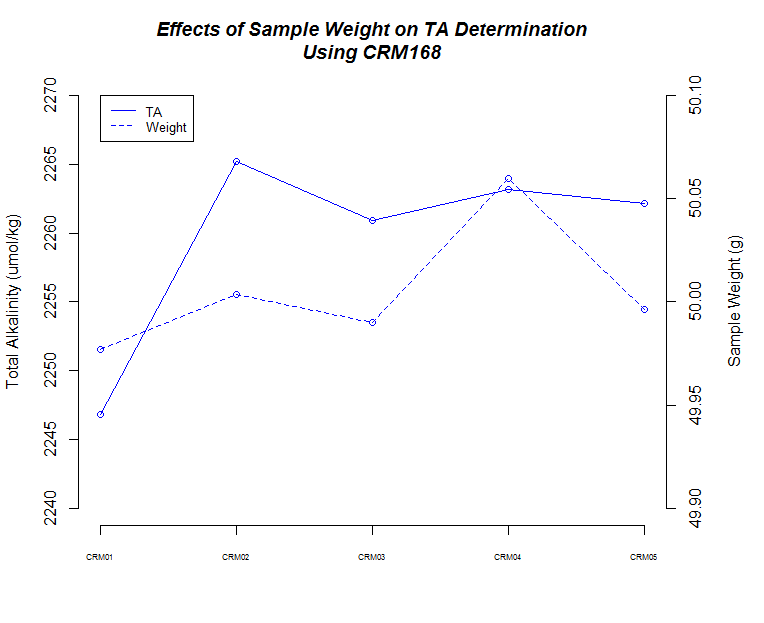
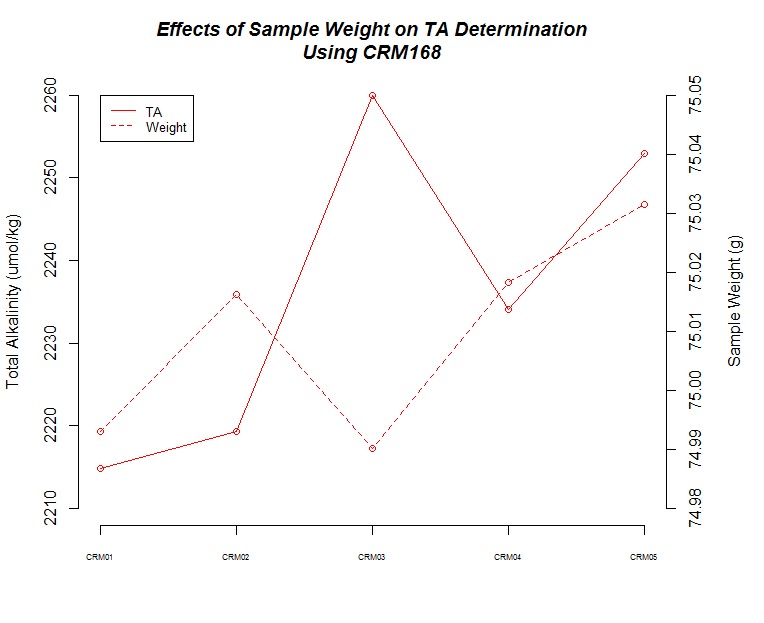
I ran five replicates of CRM Batch 168 (PDF) at three different sample weights/volume (50g, 75g, 100g) to make sure the titrator was producing consistent results and evaulate how accurate our measurements are.

Here’s the R Studio Project folder with all the data/scripts used to gather the data and produce the plots:

Here’s a bunch of graphs to consider:

Sample Mean TA Standard Deviation
CRM 168 2071.47 NA
50mL 2259.66 7.35
75mL 2236.22 19.96
100mL 2226.73 14.49

First thing to notice is that all sample measurements, regardless of volume, produce a TA value that is ~10% higher than what the CRM is certified to be. I’ve previously discussed this with Hollie and she’s indicated that there are two options:

  1. Calculate an offset relative to what the CRM is supposed to be and apply this offset to any sample measurements.

  2. Do not determine offset and just report calculated values, while providing CRM info.

The next thing that I noticed is the 50mL (g) samples produced the most consistent measurements.

There also seems to be a pattern where fluctuations in TA values across replicates are mirrored by changes in weight for each corresponding replicate.

Finally, although it isn’t explicitly addressed, there is a time element in play here. As sample number increases, the longer those samples sat in the sample changer before titration. Oddly, it appears that there could be an effect on samples as they sit (e.g. sample evaporation prior to titration) when one considers the 75mL and 100mL samples, but both of those result in opposing trends, while the 50mL samples do not seem to suffer from any sort of time-related changes…


The Wrap Up

Whew! We made it! I’ll wait to get some feedback from lab members and Hollie before cranking through all of Hollie’s samples, but I feel pretty good about proceeding with a 50mL sample volume. If we decide to calculate an offset later on, it should only be a relatively minor tweak to our script.

Next up, figure out a way to pull out all of Hollie’s salinity data for the samples I’m going to measure and incorporate that into the TA_calculation.R script.

Ubuntu Installation – Convert Apple Xserve “bigfish” to Ubuntu

Due to hardware limitations on the Apple Xserves we have, we can’t use drives >2TB in size. “Bigfish” was set up to be RAID’d and, as such, has three existing HDDs installed.

We wanted to upgrade the HDD size and convert over to Linux (Ubuntu) so that we could utilize the Linux operating system for some of our bioinformatics programs that won’t run on OSX.

I installed Ubuntu 16.04LTS to the SSD boot drive (128GB) and installed three, 2TB HDDs. However, it cannot detect the HDDs due to the Apple hardware RAID controller! Searching the internet has revealed that this is a commonly encountered issue with RAID’d Apple Xserves and Linux installs.

I haven’t come across a means by which to remedy this. Will likely have to install an OS X version in order to make this computer usable. Although, that won’t limit us too terribly in regards to program usage. Most programs will run fine on OSX.

Samples Received – Triploid Crassostrea gigas from Nisbet Oyster Company

Received a bag of Pacific oysters from Nisbet Oyster Company.

Four oysters were shucked and the following tissues were collected from each:

  • ctenidia
  • gonad
  • mantle
  • muscle

Utensils were cleaned and sterilized in a 10% bleach solution between oysters.

Tissues were stored briefly on wet ice and then stored at -80C in Rack 2, Column 3, Row 1

NovaSeq Assembly – The Struggle is Real – Real Annoying!

Well, I continue to struggle to makek progress on assembling the geoduck Illumina NovaSeq data. Granted, there is a ton of data (374GB!!!!), but it’s still frustrating that we can’t get an assembly anywhere…

Here are some of the struggles so far:

Meraculous:

SOAPdenovo2

JR-Assembler

  • Can’t install one of the dependencies (SOAP error correction)
  • Actually, I need to try the binary version of this, instead of the source version (the source version fails at the make step)

So, next up will trying the following two assemblers:

  • JR-Assembler: Will see if SOAPec binary will work, and then run an assembly.
  • AllPaths-LG: I was able to install this successfully on Mox.

Additionally, we’ve ordered some additional hard drives and will be converting the old head/master node on the Apple Xserve cluster to Linux. The old master node is a little better equipped than the other Apple Xserve “birds”, so will try to re-run Meraculous on it once we get it converted.

Assembly – Geoduck Illumina NovaSeq SOAPdenovo2 on Mox (FAIL)

Trying to get the NovaSeq data assembled using SOAPdenovo2 on the Mox HPC node we have and it will not work.

Tried a couple of times and it hasn’t run successfully. Here are links to the files used on Mox (including the batch script and slurm output files). I made slight changes to the formatting of the batch script because I thought there was something wrong. Specifically, the slurm output file in the 20180215 runs does not accurately reflect the command I issued (i.e. 1> ass.log is command, but slurm shows > ass.log).

NOTE: In the 20180218 run, I have excluded transferring the core dump file due to its crazy size:

Here’s the error log generated by SOAPdenovo2 in the 20180218 run (the last line is all you really need to see, though):

Version 2.04: released on July 13th, 2012
Compile May 10 2017 12:50:52

********************
Pregraph
********************

Parameters: pregraph -s /gscratch/scrubbed/samwhite/20180218_soapdenovo2_novaseq_geoduck/soap_config -K 117 -p 24 -o /gscratch/scrubbed/samwhite/20180218_soapdenovo2_novaseq_geoduck/ 

In /gscratch/scrubbed/samwhite/20180218_soapdenovo2_novaseq_geoduck/soap_config, 1 lib(s), maximum read length 150, maximum name length 256.

24 thread(s) initialized.
Import reads from file:
 /gscratch/scrubbed/samwhite/20180129_trimmed_again/AD002_S9_L001_R1_001_val_1_val_1.fq.gz
Import reads from file:
 /gscratch/scrubbed/samwhite/20180129_trimmed_again/AD002_S9_L001_R2_001_val_2_val_2.fq.gz
--- 100000000th reads.
--- 200000000th reads.
--- 300000000th reads.
Import reads from file:
 /gscratch/scrubbed/samwhite/20180129_trimmed_again/AD002_S9_L002_R1_001_val_1_val_1.fq.gz
Import reads from file:
 /gscratch/scrubbed/samwhite/20180129_trimmed_again/AD002_S9_L002_R2_001_val_2_val_2.fq.gz
--- 400000000th reads.
--- 500000000th reads.
--- 600000000th reads.
--- 700000000th reads.
Import reads from file:
 /gscratch/scrubbed/samwhite/20180129_trimmed_again/NR005_S4_L001_R1_001_val_1_val_1.fq.gz
Import reads from file:
 /gscratch/scrubbed/samwhite/20180129_trimmed_again/NR005_S4_L001_R2_001_val_2_val_2.fq.gz
Import reads from file:
 /gscratch/scrubbed/samwhite/20180129_trimmed_again/NR005_S4_L002_R1_001_val_1_val_1.fq.gz
Import reads from file:
 /gscratch/scrubbed/samwhite/20180129_trimmed_again/NR005_S4_L002_R2_001_val_2_val_2.fq.gz
Import reads from file:
 /gscratch/scrubbed/samwhite/20180129_trimmed_again/NR006_S3_L001_R1_001_val_1_val_1.fq.gz
Import reads from file:
 /gscratch/scrubbed/samwhite/20180129_trimmed_again/NR006_S3_L001_R2_001_val_2_val_2.fq.gz
Import reads from file:
 /gscratch/scrubbed/samwhite/20180129_trimmed_again/NR006_S3_L002_R1_001_val_1_val_1.fq.gz
Import reads from file:
 /gscratch/scrubbed/samwhite/20180129_trimmed_again/NR006_S3_L002_R2_001_val_2_val_2.fq.gz
Import reads from file:
 /gscratch/scrubbed/samwhite/20180129_trimmed_again/NR012_S1_L001_R1_001_val_1_val_1.fq.gz
Import reads from file:
 /gscratch/scrubbed/samwhite/20180129_trimmed_again/NR012_S1_L001_R2_001_val_2_val_2.fq.gz
Import reads from file:
 /gscratch/scrubbed/samwhite/20180129_trimmed_again/NR012_S1_L002_R1_001_val_1_val_1.fq.gz
Import reads from file:
 /gscratch/scrubbed/samwhite/20180129_trimmed_again/NR012_S1_L002_R2_001_val_2_val_2.fq.gz
Import reads from file:
 /gscratch/scrubbed/samwhite/20180129_trimmed_again/NR013_AD013_S2_L001_R1_001_val_1_val_1.fq.gz
Import reads from file:
 /gscratch/scrubbed/samwhite/20180129_trimmed_again/NR013_AD013_S2_L001_R2_001_val_2_val_2.fq.gz
--- 800000000th reads.
--- 900000000th reads.
-- Out of memory --

I guess I’ll explore some other options for assembling these? I’m having a difficult time accepting that 500GB of RAM is insufficient, but that seems to be the case. Ouch.